

How To Change All Shipping Templates In Seller Central
September 26, 2018 Jen Lopez
If you've been following along with our recent blog posts, you've likely stumbled upon our Guide to Amazon Seller Promotions. And if you haven't, well, you might want to start there first.
In today's post, we'll be walking through a more specific promotion type: Free Shipping.
If you think, "Oh, Free Shipping is no big deal these days," think again. After all, that's one of the major selling points on most Amazon purchases, and why Amazon now has more than 100 million Prime members worldwide, am I right?
To create a Free Shipping promotion in Seller Central – it's pretty simple. The only caveats are that doing so will not help you win the Buy Box on Amazon, and it will only be applicable to FBM (fulfillment by Merchant) products.
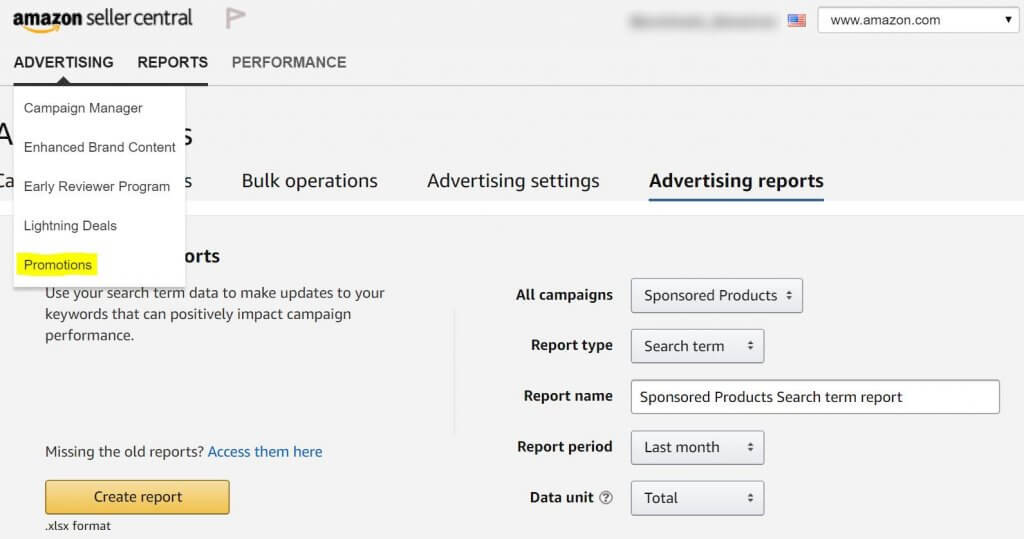
Step 1 – Login & Go to Promotions:
To create a Free Shipping promotion, log into your Amazon Seller Central account, and at the top select Advertising > Promotions.
Step 2 – Create Your Product Selection:
After selecting Promotions, navigate over to the Manage Product Selection tab. From here, click "Create Product Selection."

Once you select Create Product Selection – you'll be given the option to select which products you want to promote in a variety of ways. We most typically chose ASIN List.

You can select different products to offer Free Shipping in a variety of different ways. Once you select how you'd like to create your product selection, you'll be given options to add a Tracking ID, Internal Description and then create a list based on your option choice. Be careful when selecting which items to add to your list, as you'll want to make sure they are typed in properly.
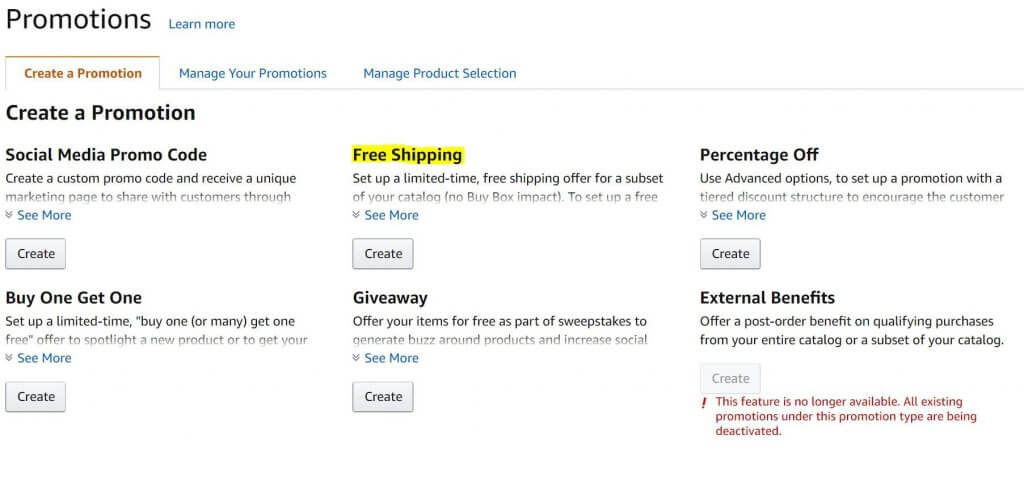
Step 3 – Set up Your Promotion:
Once you have submitted your product selection, navigate back to the Create a Promotion tab, and select "Create" under "Free Shipping."
Once you hit Create, a window displaying all your promotion options will appear. In the interface, Step 1 is selecting the conditions of your promotion.
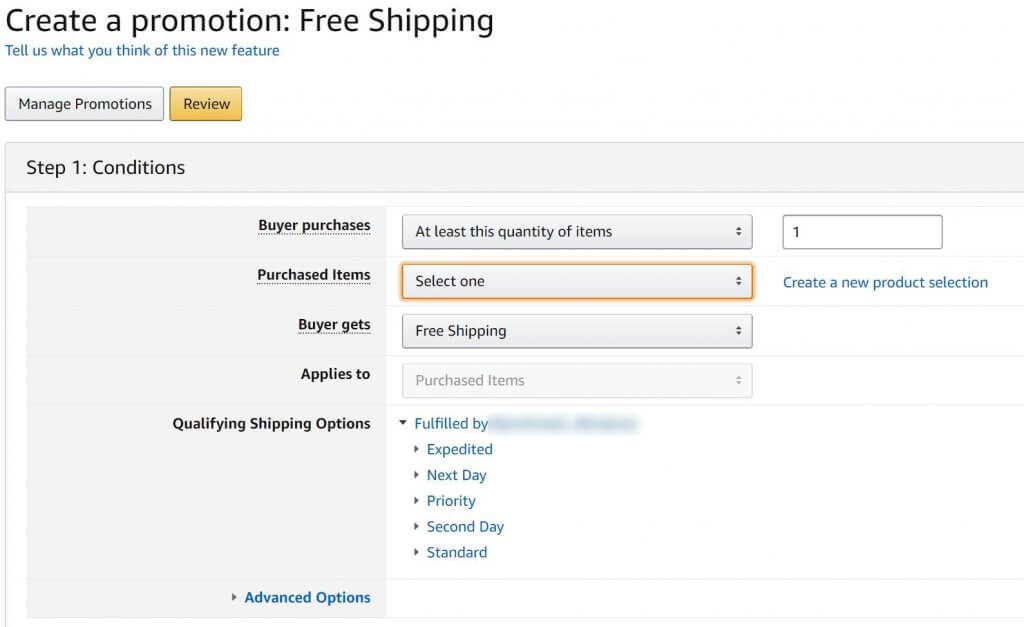
In the first box, you'll see "Buyer Purchases" and this is where you select the conditions for your Free Shipping Promotion. You have two options:
- At least X quantity of items: for example, if your customer buys three T-shirts, they get Free Shipping
- At least X amount in dollars: for example, if your customer spends at least $50, they get Free Shipping
After you select which buyer purchase option works for you, the next field to fill in is the "Purchased Items" section. This is where you would select the product selection grouping that we created in Step 2.
Underneath this is the "Buyer Gets" field, where Free Shipping will be pre-populated. No need to make any changes here.
The next field is called "Qualifying Shipping Options," which will give you choices on which shipping methods you may offer for free. This is important to consider, as the cost of certain shipping options might be more of a strain on your business than others. As a note, you may not see all the shipping options displayed in our image above, as these might be unique to your business based on shipping methods you created in your Shipping Template when you first created your Amazon Seller Central account. If an option is selected, it will be made available to the customer for free at the time of purchase.
Once you've filled out the Conditions section of the promotion setup, you'll see an area for Scheduling (Step 2 in the Amazon interface), and for Additional Options (Step 3 in the interface).
Step 4 – Scheduling
Scheduling is pretty straightforward. Just plug in your dates and run-time, name your promotion and you are ready to go! Like with the Percentage-Off Promotions, that we covered prior, you'll want to make sure that you schedule the promotion at least 4 hours out, or it will be automatically disapproved.

Step 5 – Selecting Additional Options
After filling in your scheduling options, you can navigate down to "Additional Options." This is where you can create a Claim Code (if you desire one) and have the option to create Custom Messaging.

There are three options for creating a claim code. You can choose from the following:
- Single-Use: Each claim code can only be used once and is a unique 16-digit number
- Group: One code that can be used an unlimited amount of times until the promotion ends. This code can be more generic, such as "FREESHIP"
- None: This will allow your promotion to be activated automatically, if a customer qualifies for the promotion based on the Buyer Options you selected. Your customer will not be required to enter a code.
To make an educated selection, consider the type of promotion you'll be running. If you're concerned about people abusing the promotion, Single-Use is the way to go. If you plan on making this a bit easier for your customers and don't expect a wild number of people to participate (maybe you are only promoting to past purchasers via email, or through a retargeting ad), Group is a great option.
A few notes from Amazon regarding Claim Codes that you should consider as you develop Claim Codes for your Free Shipping promotion:
- You may combine any number of unrestricted claim codes.
- You may not include more than one preferential claim code in a single order.
- You may not combine an exclusive claim code with any other claim code.
- If a buyer qualifies for more than one preferential claim code, the system will select the code that provides the greatest discount.
The last step on this page is deciding whether you want the savings outlined on the product detail page and deciding what other custom text you want shown on the Checkout Page. To see these options, expand the menu for Customize Messaging.

If you want your promotion on your detail page, click the box titled, "Detail page display text." Then, you can edit the following fields to customize the text shown to your customers:
- Checkout Display Text: Shown to the buyer in the checkout phase
- Purchased Items Display Text: The name of items in the promotion, used in the detail page display text
- Detail Page Display Text: The text that is shown under the "Promotions and Special Offers" section of the product detail page
Step 6 – Review & Submit!
Once you've set up your promotion, it's time to select the Review button. Check over each part of your promotion to ensure that it is all correct. Remember the impact offering Free Shipping can have on your business, and make sure you have set the appropriate guardrails so that you are prepared to cover the shipping costs.
All done reviewing? Time to submit!
If you need help setting up a Free Shipping promotion on Amazon give our team a call today. We'll help you out!
How To Change All Shipping Templates In Seller Central
Source: https://www.eboostconsulting.com/five-easy-steps-to-running-free-shipping-promotions-in-seller-central/
Posted by: tuttlementir.blogspot.com
0 Response to "How To Change All Shipping Templates In Seller Central"
Post a Comment